
What good is a multi-select choice set when it doesn’t turn in to a collection? Seriously, this seems like a bit of an oversight. Lucky for us we’ve found a way around this little dilemma. So welcome back Trailblazers as we learn how to turn a multi select choice or picklist to a collection variable so we can unlock its power in a lightning flow.
What is a collection?
Before we start digging in to the how, let’s talk about the what. What is a collection? A collection references a set of values or records. If I have a Case, I have a single record. When I gather multiple cases to a grouping, I have a Collection. Collections don’t just have to refer to groupings of records, they can also be groupings of things like text or number variables.

The Dilemma
While collections are quite handy in iterating through items in a flow there is one little dilemma. See that choice grouping? If I select two records and attempt to reference the choice set it only returns the last selection. Kind of makes you wonder what the point of it is right?
The good news is after selection the values can be turned in to a string of semi-colon separated values that we can turn in to a collection. Come check it out.
Our Example
To demonstrate how to solve this dilemma we are going to create a flow that allows us to close multiple cases and post the same comment to each of them all from the same screen.
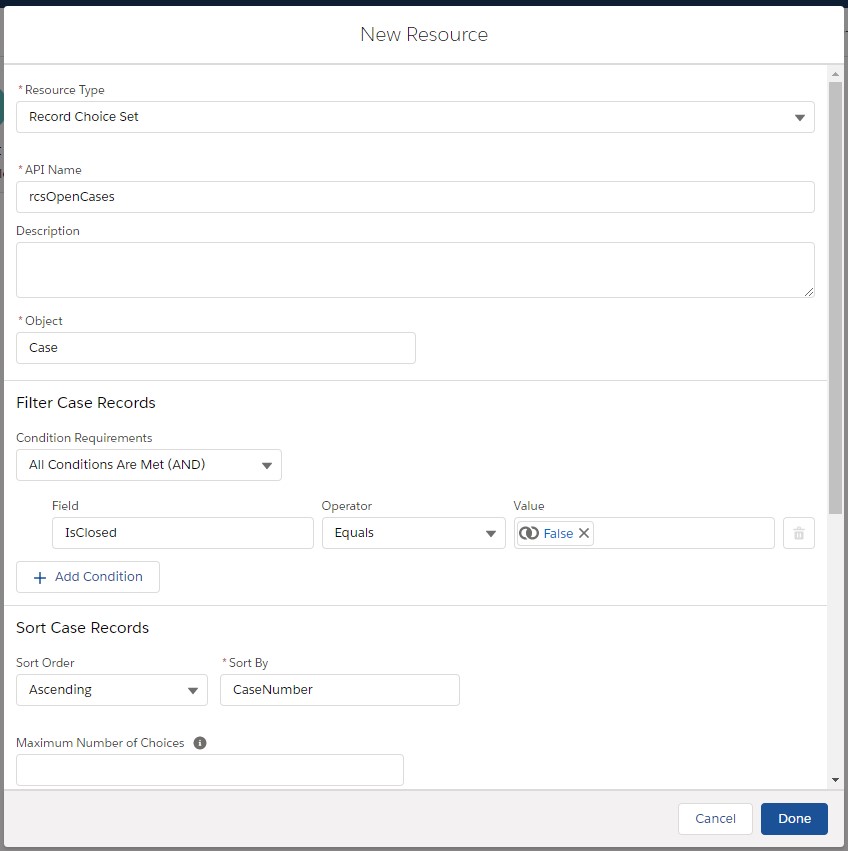
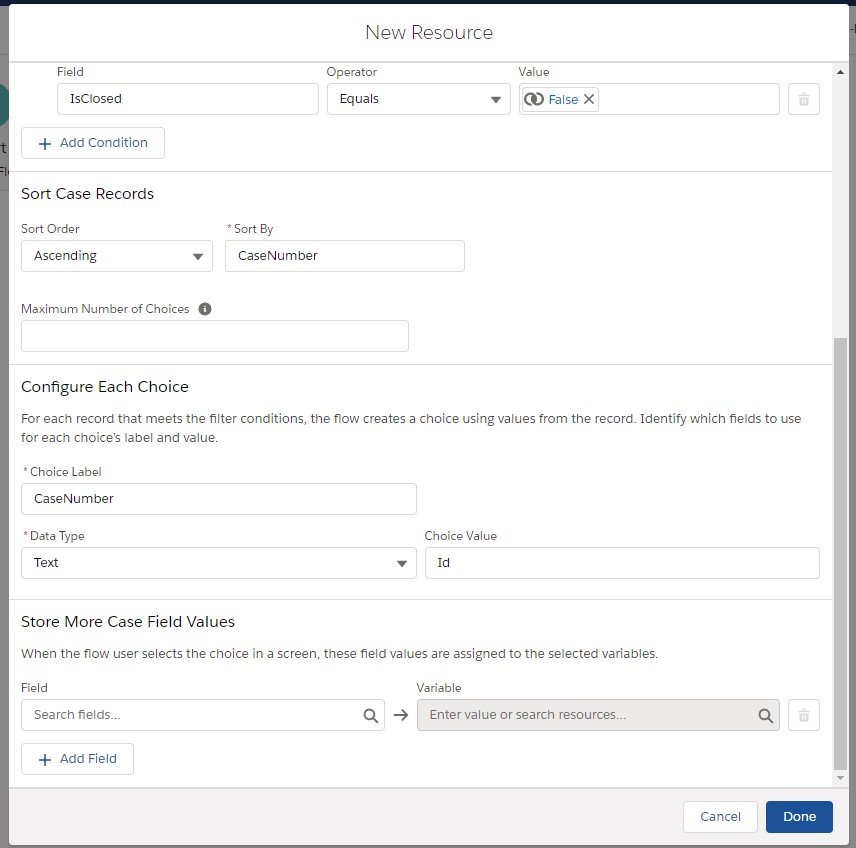
Find Our Open Cases
The first step is to create a record choice set. This will allow us to display on the screen the cases available for selection. First, we narrow the records down to the Case Object. As we are wanting to close the cases, it doesn’t make much sense to display cases that are already closed. To filter out Closed Cases we can select IsClosed Equals False. For this example, we are going by Case Number and sorting them in Ascending Order.
With this label we are showing the Case Number but for the Choice Value we want to store the record Id’s. It allows us to reference the Case Id without having to do additional lookups. We don’t need to store any additional values for now.


Create Our Screen
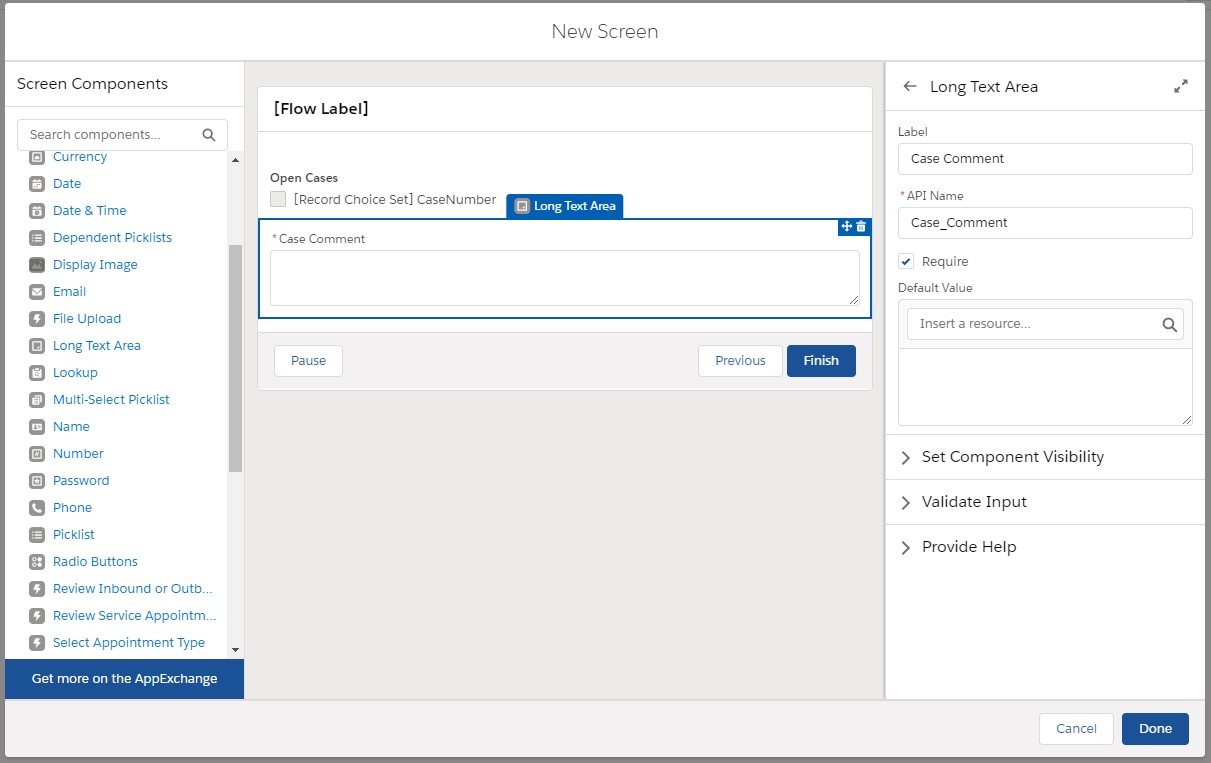
Next up we need a place to select the cases we wish to close and a spot to insert our comments to be added. We have named the screen: Close Multiple Cases With Comment (Close_Multiple_Cases_With_Comment). We then added a Checkbox Group and labeled it: Open Cases(Open_Cases). We then added our Record Choice Set (rcsOpenCases) as the Choice. This will automatically display all the open cases and allow the user to select multiple cases. Finally we added a Long Text Area and labeled it: Case Comment(Case_Comment). We will pass this value when we create the closing case comment.
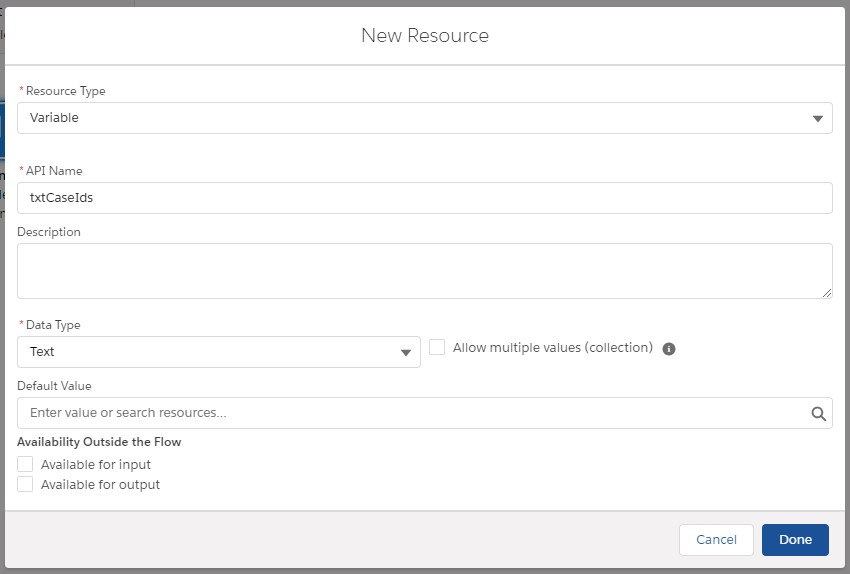
Passing the Ids to a Text Variable
Remember how we mentioned the choice select would not automatically turn the selected values in to a collection? Well this is where we are going to help. The first step is to create a text variable. We are naming ours: txtCaseIds. Next, now that we have created the variable we are going to stamp the ids from the choice set as plain text values which will result in the values looking like the following:
“Case Id 1; Case Id 2; Case Id 3″
If you are looking closely you may notice there is no semicolon after Case Id 3. There are a number of ways of updating the formula to catch the last value, or there is the lazy way. In my assignment node I’m going to manually add the semicolon after the Open Cases assignment. This will give us a chain that looks like:
“Case Id 1; Case Id 2; Case Id 3;”

Prepare the Formulas
Now that our Ids are in a long text string, we can create two formulas. The first formula is used to identify the current Id number. Then the second formula is used to update the text string with our Ids to remove the Id we just processed. See below.
Our Original String:
“Case Id 1; Case Id 2; Case Id 3;
First Formula:
“Case Id 1”
Second Formula:
“Case Id 1; Case Id 2; Case Id 3; – Case Id 1”
Both of our formulas should be of the text type. It is important to insert the formulas in order as the second formula does reference the first.
TRIM(
LEFT(
{!txtCaseIds},
FIND(
“;”,{!txtCaseIds}
)
-1
)
)
TRIM(


SUBSTITUTE(


{!txtCaseIds},{!forOneCaseId}+";",""


)


)


Turning Our Text Into a Collection
After we have our formulas we can use a choice element to determine if we have finished reviewing each of the Ids listed. To do this we check if the text variable (txtCaseIds) has any values left in it. If no values are left (txtCaseIds = blank) we have separated each of our ids and are ready to proceed with them.


Creating Our Variables
As we are pulling out each Case Id to work with it there are a few variables we will want in order to make the most of our time.
varCase: A Record variable on the Case Object
varCaseComment: A Record variable on the Case Comment
colCases: A Record variable on the Case Object and Allow multiple values(collection)
colCaseComments: A record variable on the Case Comment object and Allow multiple values(collection)


Create Records to Add to Collections
While we could take each Id and add it to a Collection right away, that would require an extra loop. Instead while we have the Case Id handy we can assign the update for cases and prep the Case Comments. In our choice selection if the text variable is not yet parsed in to a collection the forOneCaseId will have a single Case Id assigned to it. With that Case Id we can start defining our two record variable using the data below:
1. Assign the Case Id to the varCase record variable Case Id – this allows us to update that case record
2. Set the varCase record variable Status to Closed – this will let us close the case
3. Set the varCaseComment record variable Parent Id to the forOneCaseId – this creates a case comment associated to the record id
4. Set the varCaseComment record variable Body to the Case Comment field from the screen – this will add the text to the case comment

Add Record Variables to Collections
In the previous assignment node we configured values of the Case record using its variable and defined a Case Comment. Now, we need a separate assignment node to add each of these record variables to their respective collections.

Remove Current Case Id
Now that we have created the records and added them to the collection it’s time to update the Case Id text variable with the formula that removes the current Case Id so we can then process the next one.
Update Case Collection
Once all the Case Ids have been parsed from the text variable we can update all of the cases at once by using and Update Records node and referencing the Case Collection (colCases).
Make sure the How to Find Records to Update and Set Their Values is set to the first choice (Use the IDs and all field values from a record or record collection)


Create Case Comments
Since the Case Comments don’t exist yet we can use a Create Records node and reference the Case Comments collection to create the Case Comments for the cases we are closing.
Simply update the How Many Records to Create to Multiple and specify the colCaseComments as the Record Collectio you wish to use.
Putting It All Together
See the image below for the fully connected flow. Then toggle through the screen shots to see the flow in action. (Please note images are from a debug mode, to use the flow live it would need to be connected from something like a quick action or embedded in a Lightning Page).


As with many things in Salesforce there is more than one way to achieve this goal. Check out some of the other options:
Automation Champion: https://automationchampion.com/tag/parsing-multi-select-picklist-in-flow/
Gorav Seth: https://goravseth.com/using-a-dynamic-choice-to-select-multiple-records-in-visual-workflow
Infallible Techie: https://www.infallibletechie.com/2019/11/how-to-loop-through-multi-picklist.html
Let us know what you think in the comments or post an article idea in the Lightning Flow Builder group.
See you on the trails Trailblazer!